
I met actor Richard Louis Ulrich last year, while I was working as the set photographer for a local film production. With actress Ashley Bauman, Richard was part of a villainous duo who gave the film’s protagonist no end of trouble, and their chemistry and face-pulling antics on set made my shots a lot more fun. I knew Richard would be great to work with for some more experimental shots, so in January I booked him into the studio for a session.


I was interested in playing with gels and with some rear curtain sync action, and getting not only vibrant color, but also motion in the images. These kind of shots take quite a bit of tinkering to work out, and Richard was fantastically patient and enthusiastic about the process, which made my job a lot easier.
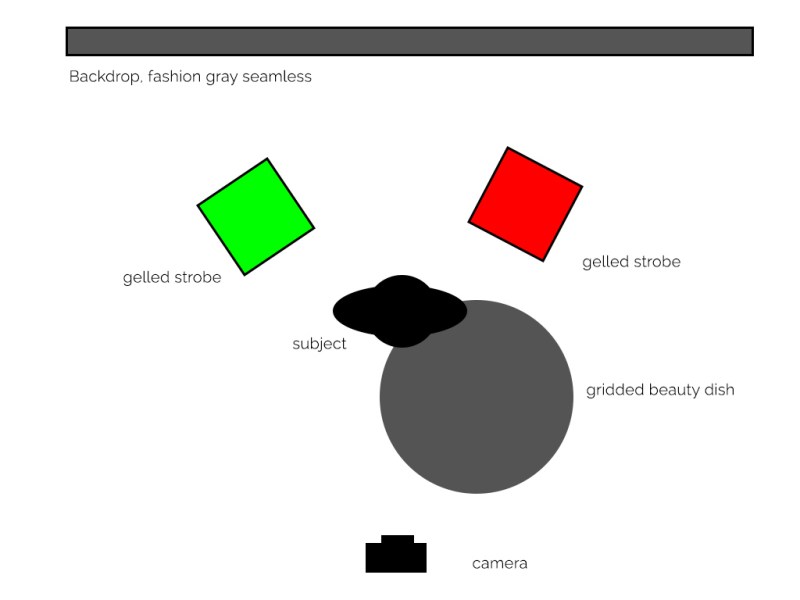
We started with just gels, playing with some blue and purple tones. This is a three-light setup—all Flashpoint XPLOR600 strobes unless noted. One strobe was set behind the subject on either side, gelled with barn doors on the strobes to prevent any flare back into the camera. Above the subject and slightly to camera right I had a gridded 22″ beauty dish as the key light. The gridded beauty dish left lots of great, deep shadows on the sides of the face to show the colors of the gels, and kept any light from spilling onto the backdrop.


Once I had the lighting down for the still shots, I changed the gel colors to a slightly more demonic red/green mix, and, using my Flashpoint R2 pro trigger, set the strobes to fire with rear curtain sync. (Rear curtain sync allows for motion blur in camera by exposing using both the ambient light in the room and strobes. It can create some amazing shots, but it’s tricky to master.)
I love how the final shot has an almost Jekyll & Hyde vibe, and it also hearkens back to the classic tragedy/comedy masks which represent theater — fitting for Richard!

(Note: For these shots, the modeling lights in the strobes were kept on, which is what allowed for the colored motion blur. The room was otherwise blacked out to control for other ambient light .)
This shot required some experimentation to get the motion and expressions just right, and Richard was awesome to work with. This final shot was a 3.2 second exposure in which Richard started facing the camera. When he heard the shutter click he moved his head to his left, froze, moved his head to the right, froze, and then moved his head back to the center for the final strobe flash. He did all this while keeping his shoulders as still as possible in order to minimize motion blur. He did an amazing job!
The order of the movements was particularly important, because the final strobe flash is what locks in the main exposure. We did a few moving from right to left, and ended up with an ear in the middle of Richard’s face for our troubles. See this failed experimental shot below:

So the key to doing this successfully is to END on the movement you want frozen “in front” of the exposure. Any motion blur will be “behind” whatever is happening when the strobe fires. (If that doesn’t make sense let me know, and I will try to explain more in the comments.)
I am not listing the camera and lenses for this shot, because that doesn’t matter. What matters is the timing, the ability to use rear curtain sync with your camera/flashes/strobes, and patience. I also really recommend shooting tethered, because it will help you see what you’re getting much more clearly. Tethering to a larger screen really helped me see that some shots that looked great on the back of the camera still had issues that needed some work.
Hope this was interesting and informative! Let me know if you have any questions and I will answer them as best I can!


